
Wallpaper
Scissors
Pencil
Plumb line
Batten or long ruler
Wallpaper paste
Paintbrush
Smoothing brush or roller
Sponge

Step One: Measuring And Cutting The Wallpaper
Cut enough lengths of paper to complete the first wall, allowing 100mm for trimming, or more if your wallpaper has a large pattern or design. Push a length of the paper into a top corner of the room and mark the wall about 25mm in from the free edge. Hold the plumb line at ceiling height so that it passes through the pencil mark and make several more marks along the line. Join the marks up with the ruler or batten.
Cut enough lengths of paper to complete the first wall, allowing 100mm for trimming, or more if your wallpaper has a large pattern or design. Push a length of the paper into a top corner of the room and mark the wall about 25mm in from the free edge. Hold the plumb line at ceiling height so that it passes through the pencil mark and make several more marks along the line. Join the marks up with the ruler or batten.
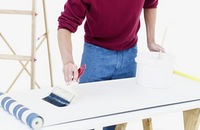
Step Two: Pasting
Paste the first sheet by spreading some paste into the centre and working the brush in a herringbone pattern to spread the paste to the edges. A good technique is to hold the paper against the table edge furthest from you and paste up to this edge first. Then pull the paper towards you and paste the nearest edge.
Paste the first sheet by spreading some paste into the centre and working the brush in a herringbone pattern to spread the paste to the edges. A good technique is to hold the paper against the table edge furthest from you and paste up to this edge first. Then pull the paper towards you and paste the nearest edge.
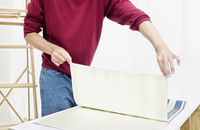
Step Three: Folding
Fold the pasted sides inwards so that no paste touches the face side. Hang the folded paper over a broom between two chairs. Apply paste to two or three more pieces of paper to allow the paper to absorb some of the paste and become more pliable before you hang it.
Fold the pasted sides inwards so that no paste touches the face side. Hang the folded paper over a broom between two chairs. Apply paste to two or three more pieces of paper to allow the paper to absorb some of the paste and become more pliable before you hang it.
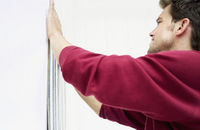
Step Four: Hanging The First Piece
Lightly press the top of the first length against the wall, with a 50mm overlap at the top. Slide the edge up to the vertical line and use a smoothing brush to get rid of air bubbles. Again, use herringbone strokes from the centre. Trim the top and bottom of the length by creasing the paper into the skirting and ceiling/picture rail with the back of the scissors. Cut along the crease.
Lightly press the top of the first length against the wall, with a 50mm overlap at the top. Slide the edge up to the vertical line and use a smoothing brush to get rid of air bubbles. Again, use herringbone strokes from the centre. Trim the top and bottom of the length by creasing the paper into the skirting and ceiling/picture rail with the back of the scissors. Cut along the crease.

Step Five: Cleaning Off The Excess Paste
Hang the next length in the same way, butting the edge neatly against the first piece. Make sure the edges are firmly glued down by running a seam roller along the joint. Always sponge off any excess paste with a clean wet sponge or it will dry as a shiny patch.
Hang the next length in the same way, butting the edge neatly against the first piece. Make sure the edges are firmly glued down by running a seam roller along the joint. Always sponge off any excess paste with a clean wet sponge or it will dry as a shiny patch.
Step Six: Finishing
Repeat the process for each length, ensuring that the edges meet exactly and the pattern is matched. At internal corners, measure from the last full width roll to the corner and add 15mm. Paste this cut length to the wall and press the small overlap piece around the corner. Overlap this piece with the next length of paper, using a plumb line for accuracy. For external corners, use the same technique but allow about 25mm overlap. Hang the first length on the new wall so that it is about 12mm from the corner.
TIPS
- Turn off the electrical supply before papering around sockets and switches. Remove the cover plates and hang the paper as normal, trim to size and then re-fit the plates.
- Be sure that all the rolls you buy have the same batch number as colour may vary slightly from batch to batch.
- Use bulldog clips to hold the paper on the table as you paste it.
- Make a small cross with a craft knife in the centre of any air bubbles under the dry paper. Brush some paste on the underside of the flaps and press down with a roller.
- Don't mix old and new paste. Mix up enough to cover one wall at a time.
0 komentar:
Post a Comment