
Tape measure
Scissors
Fabric
Lining fabric, plus extra to create dowel pockets
Needle and pins
Sewing machine
Thread
Tailors' chalk
Dowels cut to 3cm less than your intended blind width
Blind rings
Wooden batten the same width as the blind
Drill
Velcro Sew & Stick
Drill and drill bits
Wall plugs
Screw eyes
Lengths of Roman blind cord. (Each length should be one and a half times the length of the blind plus the width of the blind. You will know how many lengths to cut once you know how many rows of blind rings you need)
Blind acorn (The knob attached to the end of a blind pull cord)
Cleat and screws
Step One: Cut And Stitch The Fabric Sides And Bottom
Measure the window so you know how wide and long you'll need the blind to be. Add 5cm to the width and drop for hems. Cut out the blind fabric and lining fabric. With the right sides of the fabric facing and raw edges matching, pin the fabric sides and bottom together and stitch in a 2.5cm seam. Turn the blind right side out and press.
Measure the window so you know how wide and long you'll need the blind to be. Add 5cm to the width and drop for hems. Cut out the blind fabric and lining fabric. With the right sides of the fabric facing and raw edges matching, pin the fabric sides and bottom together and stitch in a 2.5cm seam. Turn the blind right side out and press.
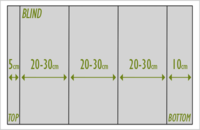
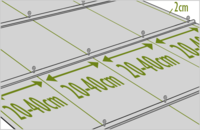
Step Two: Mark The Position Of The Dowels
Measure 5cm down from the top, and then, from this starting point, you will need to mark regular intervals down the length of the blind - these will be the positions of the dowels. These should be between 20cm and 30cm apart, finishing with a bottom section that is half the size of the rest. (For example, each interval is 20cm and the bottom interval is 10cm). Mark these intervals with tailors' chalk.
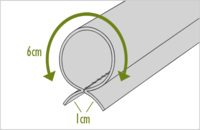
Step Three: Stitch The Dowel Casings
Cut out strips of lining fabric 8cm wide by the width of the blind. You will need one of these dowel pockets for each of the marked intervals. Right sides together, fold in half along the length, and taking 1cm seams stitch the long raw edge and one end.
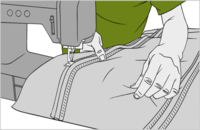
Step Four: Stitch The Dowel Casings To The Blind
Turn through the pockets and press. Thread up your sewing machine with your lining-coloured thread on the machine and your blind-coloured thread on the bobbin. Pin and stitch just inside the folded edge of each pocket along the lines marked on the blind, sewing through all fabric layers.
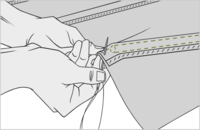
Step Five: Stitch On The Blind Rings
Sew a blind ring to the end of each pocket 2cm from the edge of the fabric, and at regular intervals of between 20cm and 40cm across the width of the blind.
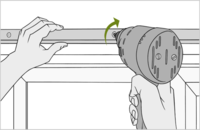
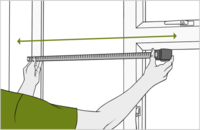
Step Six: Secure The Batten to the Window
Using a drill and screws, secure the batten in position on the window frame and stick the hook side of a strip of Velcro Sew & Stick to the front. Screw screw eyes into the underside of the batten to align with the rings on the blind, plus an extra screw eye to the side you want to pull the cords from.
Step Seven: Stitch In The Dowels
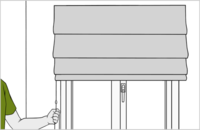
Turn down a 2.5cm hem at the top of the blind onto the wrong side, and pin and sew. Pin and stitch the loop strip of Velcro across the top of the blind. Slip the dowels into the casings and hand stitch to close the openings. Hang up the blind using the Velcro to check that it is the correct length and hangs straight.
Step Eight: Thread The Blind Cords
Remove the blind from the batten. Securely fasten the cord to each ring on the bottom of the blind. Thread the cords upwards through the rings and onto the eyelets on the batten - you might need someone else to help you! Thread the cords through all the eyelets and the extra eyelet on the side you want to secure the blind.
Thread the cords through the blind acorn, knot and trim. Screw the cleat to the wall next to the blind and use to secure the blind when it's pulled up
TIPS
- Dowels sewn into pockets at regular intervals across the blind - and cord through the rings on the dowels - create the folds when the blind is pulled up.
- You can buy blind making supplies and complete Roman blind kits online.
0 komentar:
Post a Comment