
Timber for shelves and shelf fronts
Thin MDF or match board for shelf undersides
2 x 1in (50 x 25mm) timber for battens
Pencil
Steel tape measure
Spirit level
Pipe and cable detector
Saw
Hammer drill
Masonry and wood drill bits and countersink bit
Screws
Wall plugs
Screwdriver
Wood adhesive
Hammer
Panel pins
Lost-head nails
Wood filler
Wood primer (or primer/undercoat)
Paint
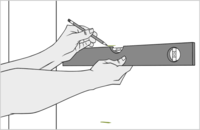
Step One: Decide On Spacing
Using the tape measure, pencil and spirit level, mark out the position for the shelves on the back wall of the alcove, remembering to allow sufficient clearance space between each shelf. Check for obstructions within the wall where you intend to drill using the pipe and cable detector.
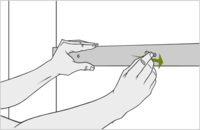
Step Two: Cut & Check The Battens
Use a saw to cut the battens to fit the back wall. Drill screw clearance holes through the batten, then put it on the wall, and push a screw through the holes to mark the position on the wall. Remove the batten.
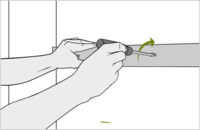
Step Three: Drill Holes In The Wall
Using the masonry bit, drill holes, plug with wall plugs and screw the batten in place. These instructions are for masonry walls. If you have stud-partition walls the brackets must be screwed to the studs.
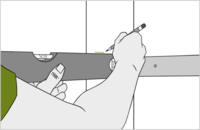
Step Four: Mark The Position On The Side Walls
Mark out the position for battens for the side walls, checking with the spirit level, then cut battens to fit and fix in the same way. If the shelves are to be flush with the alcove front, cut the side battens short of this edge by 25mm (or the same thickness as the timber shelf fronts).
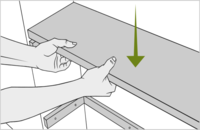
Step Five: Cut & Fix The Shelf
Saw the timber to size to make the shelf tops. You may have to shape the sides and back for a good fit. Apply wood adhesive to the top set of battens, and fix the shelf in place with wood screws at each end, countersinking the screw heads for a neat finish.
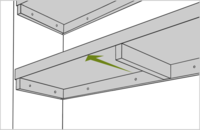
Step Six: Fit A Central Batten
Use wood adhesive and screws to fit a central batten to the underside of each shelf, from front to back, screwing it down from the top and countersinking the screws. (For extra strength or on long shelves, the central batten can be screwed to the rear batten before this is fixed in place.)

Step Seven: Fit The Shelf Undersides & Fronts
Cut the MDF or match board to fit the underside of the shelves. Glue to the battens and fix by nailing in panel pins. Cut the fronts for the shelves from timber, and nail to the battens using lost head nails. Sand the shelves, and fill any gaps with wood filler, then prime and paint to finish.
1 komentar:
They are wonderful looking shelves. So simple to make and very effective in terms of space creation. Great Job! I have floating shelves pretty much anywhere i can put them in my house. My next project is to build floating shelves around the tv on my living room wall. Going to be a tough project i think. I got the idea from Top9Home.com Wish me luck!!
Post a Comment